I've always had problems deciding how to store my make up. After a recent clear-out of all my old products, my collection has somewhat depleted and I'm not keen on spending lots of money on things such as makeup storage when I could be spending it on new products. I therefore decided to make a low-cost collection of makeup drawers from products I had in my house.
You will need:
- 1 or 2 shoeboxes
- 2 or 3 shoebox lids
- Scissors
- Glue (I like Pritt X as it is stronger than typical Pritt Stick)
- Ruler
- Masking tape
- Sellotape
- Pencils & Pens
- Superglue (optional)
- Ribbons (optional)
- Photos (optional)
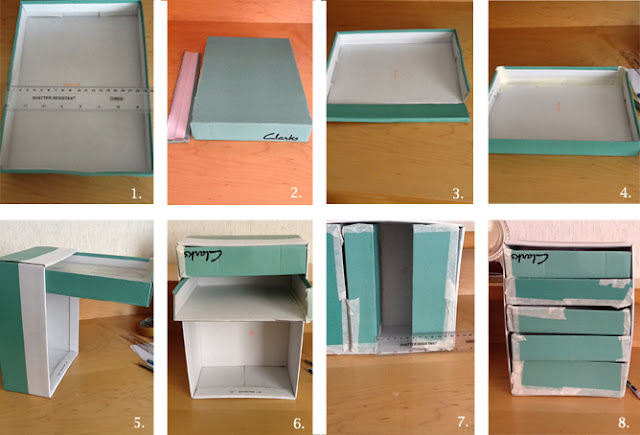
- Take the shoebox you want to use as the main skeleton of your drawers. Measure the depth, width and height of your box (see fig 1)
- Take a shoebox lid and trim it so it is the same width as your box. Keep all the off-cuts, you will use them later (see fig 2 & 3)
- Take the off-cut and re-attach it onto the edge of the lid as the 'fourth wall' using masking tape (see fig 4)
- The lid will now slot snugly into the main box (fig 5). Mark how deep you want the lid/shelf to be using a pencil and trim it to fit. Repeat step 3 to make the 'fourth wall' of your box. Your first shelf is now complete (fig 6)
- Repeat these steps to make the remainder of your drawers. If you want to make a wider drawer, just tape extra pieces of card onto the top of the standard size drawer. Don't worry about the masking tape looking 'messy' as it will be covered over later.
- Whenever you are down to your last drawer, measure how wide it needs to be (see fig 7) and make a drawer to fit.
- Voilà! Your chest of drawers is complete!
 |
| Front view |
 | |||
| I collaged my drawers and superglue-d on some bows. |


I love this idea! It's so original!
ReplyDeleteLove the Nutella idea! :)
ReplyDeleteFollow back!!! :)
www.happiprettygirls.blogspot.con
Makeup Storage Drawers
ReplyDelete