Tuesday, 3 July 2012

Tutorial | Candle Nails?!

Who loves nail art? Sorry, let's rephrase that, who doesn't love nail art? I myself love trying out new ideas with my nails, but am a bit reluctant to buy specialist tools to perfect my looks. So, I came up with the idea of using candles as nail art tools. Nearly every household has some birthday candles sitting about somewhere, so I made use of their waxy wicks to evenly apply nail polish.

 You will need:
 1. Paint your nails with two coats of your base colour

 2. Paint the wick of your candle with the white nail polish and use it to create two smooth arcs in the corner of your nail.
 3. Using another candle, paint your contrasting coloured nail polish onto the nail to fill in the space between the arcs with short lines.

 4. Colour in the smallest arc with the contrasting colour


 And you're done! I would normally use this design on just one accent finger, but I decided to show you just some of the fun designs you could use this technique for. My particular favourite is the one on my index finger (far left) because it reminds me of toothpaste!
As a disclaimer, the designs look a little rough as my white nail varnish is close to running out, but this technique worked very well with the blue accent colour - I find it easier than using professional nail art tools! Please feel free to comment below, showing me some of YOUR ideas for cool nail art on a budget.

Monday, 2 July 2012

My Beauty Hitlist

Sigh, we all have one don't we? Products you desperately want but cannot find, cannot afford or are just to lazy to get up and go look for in your nearest store. What I really need is a personal makeup shopper who will find products that will flatter my skin tone, make my hair beautiful and generally make me feel like a goddess... a girl can dream, right? Anyway, I've narrowed my (embarrassingly long - I'm talking 20+ pages here...) list down to my hitlist. These are the products I'm going to save for and buy first. I will not be distracted by Boots' amazing 3 for 2 offers and end up buying unnecessary products "because they were on sale".
I've divided my hitlist into different categories and have narrowed it down to a maximum of three products per category. I'll link them to their sites so you can drool over them with me and perhaps add them to your own lists (let me keep believing that everyone has one, for my own sanity). Also, when/if I buy any of the products in this list I will post a full review of them on this blog for you all.

Foundation/Concealer:
Chanel Vitalumière Aqua
Collection 2000 Lasting Perfection Concealer
Sonia Kashuk Hidden Agenda Concealer Palette

Blush/Bronzer:
Benefit CORALista Blush
Benefit Sugarbomb Blush
NARS Laguna Bronzer

Setting Spray:
Skindinavia Makeup Setting Spray

Lipstick:

Revlon Lip Butter in Berry Smoothie
Revlon Lip Butter in Candy Apple
Mac Lipstick in Hue

Lip Gloss:
MAC Cremesheen Glass in Deelight
NARS Lip Gloss in Orgasm

Eyeliner:
Bourjois Kohl and Contour Shadow and Light in Brun/Caramel (duo not yet available online) 

Eyeshadow Palettes:
Stila In the Light Palette
Urban Decay Naked Palette
MUA Heaven and Earth Palette

Nail Polish:
Andrea Fulerton Trio Nail Polish in Petrol in Water
Ciate Nail Tonic Hydrator
Butter London Nail Polish in Slapper

Brushes:
EcoTools Bamboo 6 Piece Brush Set
EcoTools Bamboo Buffing Brush

Moisturisers/BB Creams:
Dr Jart Regenerating Beauty Balm
Origins VitaZing

Cleansers:
Liz Earle Cleanse & Polish

Masks:
Lush Brazened Honey Fresh Face Mask
Lush Cupcake Fresh Face Mask

Heat Protectant:
Schwarzkopf Got2b Guardian Angel Heat Protectant

Hair Products:
Aussie Take the Heat 3 Minute Miracle Treatment
Aussie Luscious Long 3 Minute Miracle Treatment
Moroccan Oil Treatment

So, that's my shortened list (yes, I'm that obsessed)! So please feel free to comment below telling me what products you think I should add to my wishlist and please comment your own wishlists so I can be tempted by them too!

Sunday, 1 July 2012

Review | Soap & Glory The Fab Pore Hot Cloth Cleanser


I'm sure all of you have heard of Soap and Glory by now. The British brand have been made famous for their quality products with fab scents and reasonable price tag. I myself am a big fan of their "Flake Away Body Polish" and their "Clean On Me" shower gel which both hold a secure place in my skincare routine. After loving these products I decided to try out their range of skincare products, starting with their "The Fab Pore Hot Cloth Cleanser". Online reviews compared it to cult products such as Liz Earle Cleanse & Polish and No7's Hot Cloth Cleanser so I thought I'd give it a go before splashing out on Liz Earle! I have been using the product for approximately 2/3 months now, so I have a fair idea of how well it works.

I have normal/combination skin which gets a few dry patches in winter and a few break outs when I'm stressed (exams, I'm looking at you!) but generally I'm very lucky and have fairly good skin. I do lean towards having slightly sensitive skin but tend to get the occasional rash more on my arms and legs than my face, so I was fairly confident this product wouldn't aggravate my skin. I like a cleanser which makes my skin feel deeply refreshed and squeaky clean, removes make up easily and leaves my skin feeling soft.


 The packaging of the product is absolutely gorgeous. The product comes in a baby pink and pastel blue box with a hot pink lining. All the text on the box is cleverly written and fun - I'm a sucker for S&G's puns! The packaging of the product itself does not disappoint either. Its metallic silver and hot pink colour scheme really helps it to stand out in your bathroom cupboard and the packaging itself is robust and looks as good as new even now. My only criticism is that the tube tends to 'dent' with use. However, this is only a minor cosmetic annoyance as the packaging has not split or cracked and makes it very easy to squeeze out the desired amount of product.


The product also comes with a free muslin cloth. I personally am a big fan of this freebie, as it is very soft while still being gently exfoliating and robust. Mine has been through the wash a few times now and the only wear and tear has been that the label has faded slightly which doesn't annoy me in the slightest. Also, I'm loving the pink stitching! Little details like this really sell the product for me and make it definitely with its pricetag.


Onto the product itself. It is a medium consistency white cream with a similar consistency to toothpaste. It blends easily into the skin with gentle massaging motions. I was slightly disappointed by the scent after smelling the delicious hand food. It says it contains panthenol (no idea what that is), sweet almond, orange and lavender oils. It smells more like lavender than anything else and is moderately perfumed so is definitely not for those adverse to scents. Following the instructions on the back of the packaging I gently massage it onto my face and eye area over my makeup for roughly a minute. While it does smooth into the skin nicely, I've found that it soaks in too well! It nearly disappears into my skin instantly which makes me feel that it will clog up my pores instead of cleansing them. I then leave it for one minute as instructed and remove it by pressing it off with the muslin cloth. I soak the cloth in hot water, squeeze out the excess and press off the little still left on the surface of my skin. I usually end up resorting to rubbing in order to get my pores as clean as possible!

I find that it does an good job of removing face make up but struggles with mascara or eye make up. Don't even attempt to remove waterproof mascara with this product - not worth the hassle. It leaves my skin feeling rather average. I like my skin to feel cleansed and squeaky clean after cleansing but this product definitely does not do this for me. It leaves me feeling like I have used a cream cleanser rather than a deep pore treatment which this product claims to be.

On the other hand, you definitely get your money's worth as this product lasts for ages! I have been using it near enough daily for 2/3 months and I'd say I have 3/4 of the product still left. Definitely worth the £10 price tag if it suits your skin.

After a few months use I have found that this cleanser does an average job of keeping my skin clean - fine if my skin is behaving but does very little to clear up breakouts. However I do think this product would be suitable for those with good skin or those with dry skin who want a hot cloth cleanser which won't leave their skin parched. It does a good enough job of keeping my skin happy and I will use it up. However I will save for the Liz Earle instead of repurchasing this product.

 Soap & Glory The Fab Pore Hot Cloth Cleanser is available for £10 from Boots in the UK, for $20 from Sephora in the US and from their website for international shipping.

Thursday, 21 June 2012

Nail Polish Collection

I had a (rather depressing) clearout of all my makeup. Throwing out old foundations, dried up mascaras, nail polishes gone so dry no nail polish remover could save them and the like. After doing this I've realised that I'm down to twelve nail polishes, three clear top/base coats and two nail effect polishes. Serious splurge is needed! As I'll be reviewing all the polishes I buy in the next few weeks I thought I'd start off by showing you my current nail polish collection!

Swatches:
With flash  


Without flash
On nails
Without and with flash
[L-R Collection 2000 Hot Looks in Show Off; Barry M in Block Orange; Barry M in Acid Yellow; Barry M in Bright Red; Barry M in Navy]


Without and with Flash
[L-R Natural Collection Topaz; Rimmel London I love lasting finish in Your Majesty; Revlon Dreamer; Revlon Facets of Fuchsia; Nameless polish from a Boots giftset]
I also have an Oriflame Nail Hardener in clear; Rimmel Nail Tip Whitener; three nameless polishes from a Boots giftset in shimmery fushcia pink, shimmery purple and hot pink; NYC Long Wear Nail Enamel in Clear; No7 So Strong nail care in Clear; Barry M Instant Nail Effects in black.

I was thinking of doing a review on my best and worst nail polishes? If you're interested, let me know in the comments below! xx

Style from Scratch | DIY Makeup Storage

Welcome to "Style from Scratch"! This is my new series of tutorials and ideas for how you can create beauty products, storage ideas, and anything beauty related for next to no cost. Read on to find out how to create your own DIY Makeup Storage!

I've always had problems deciding how to store my make up. After a recent clear-out of all my old products, my collection has somewhat depleted and I'm not keen on spending lots of money on things such as makeup storage when I could be spending it on new products. I therefore decided to make a low-cost collection of makeup drawers from products I had in my house.

You will need:
  • 1 or 2 shoeboxes
  • 2 or 3 shoebox lids
  • Scissors
  • Glue (I like Pritt X as it is stronger than typical Pritt Stick)
  • Ruler
  • Masking tape
  • Sellotape
  • Pencils & Pens
  • Superglue (optional)
  • Ribbons (optional)
  • Photos (optional)
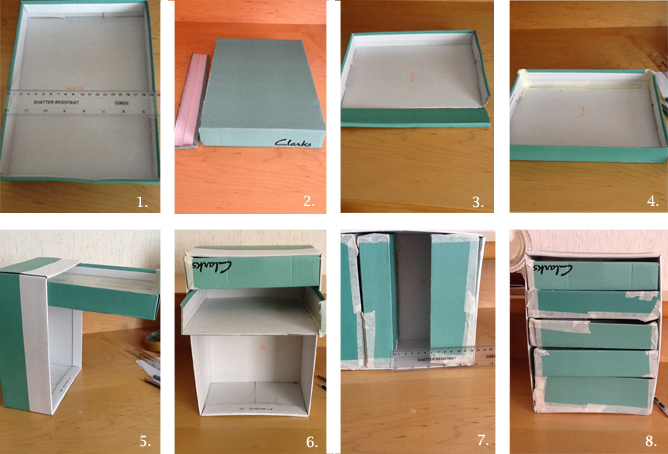
  1.  Take the shoebox you want to use as the main skeleton of your drawers. Measure the depth, width and height of your box (see fig 1)
  2. Take a shoebox lid and trim it so it is the same width as your box. Keep all the off-cuts, you will use them later (see fig 2 & 3)
  3. Take the off-cut and re-attach it onto the edge of the lid as the 'fourth wall' using masking tape (see fig 4)
  4. The lid will now slot snugly into the main box (fig 5). Mark how deep you want the lid/shelf to be using a pencil and trim it to fit. Repeat step 3 to make the 'fourth wall' of your box. Your first shelf is now complete (fig 6)
  5. Repeat these steps to make the remainder of your drawers. If you want to make a wider drawer, just tape extra pieces of card onto the top of the standard size drawer. Don't worry about the masking tape looking 'messy' as it will be covered over later.
  6. Whenever you are down to your last drawer, measure how wide it needs to be (see fig 7) and make a drawer to fit.
  7. Voilà! Your chest of drawers is complete!
And here are some pictures of my finished drawers:
Front view

I collaged my drawers and superglue-d on some bows.


Rachael x
Hello everybody!

Well, this is going to be my first ever blog post! I can't wait to jump onto the beauty blogging bandwagon, and have a few ideas for upcoming posts - so keep an eye out for them. I thought I'd best start off with a quick introduction before I post my first tutorial on this account, just to keep you in suspense, of course.

Name: Rachael
Age: 16
Starsign: I don't really follow all this 'your future is in the stars' grubbins, but after having a quick google it appears that they've changed all the dates due to the "precession of the poles". So now I've decided to think of myself as a Virgo/Leo hybrid. A lion goddess - very likely.
Relationship Status: In a relationship. 
Dress Size: Size 6/8.
Height: Short. It's a touchy subject.
Shoe Size: Floating between a 4 and a 5. Always just half a size too small for the shoes I want... *sigh*.
Likes: Music, animals, nail polish, make up, beauty, hair, horses, chocolate, nice people.
Dislikes: Smoking, odd socks, brogues (yep, I said it!), high maintenance friendships, snow (go on, shun me), ice, rain, exams, greasy food.

Rachael x